Strawberry Reusable Grocery Bag
ข้อความจากต้นฉบับ คลิก

Reusable Strawberry Grocery Bag
To make: 2
Sewing Pattern: Download pdf sewing pattern here.
Materials:
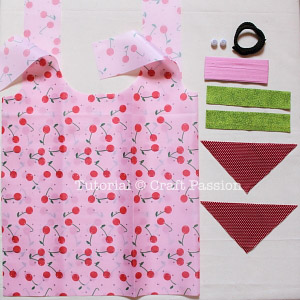
1. Fabric – thin Polyester or cotton or thin laminated fabric, 31″ x 25″
2. Fabric – Red polka-dots , 7″ x 4″, 2 pcs.
3. Fabric – Green cotton, 6 1/2″ x 5 1/2″, 2 pcs.
4. Bias tape – 3 1/2 yard
5. Cord, 15″, 1 pc. (I salvaged from the handles of paper shopping bags)
6. End bead, 13mm, 2 pcs.
7. Ribbon or cotton tape, short length (about 2″)
8. Pattern drafting paper, at least 22″ x 24″, or you may glue a few pieces of paper to make a bigger sheet
Tools:
1. Sewing machine
2. Sewing kits
3. Fabric pencil
4. Ruler & pencil
5. Drawing Compass or circle object with approx 2 1/2″ and 1 1/4″ radius.
5. Scissors
6. Adhesive tape
7. Lighter
8. Clover Wonder Clips optional, only if you are using laminated fabric.
Finished Dimension:
Approximately 15″ (W) x 20″ (H)
Remark: If you are using laminated fabric or polyester fabric which will leave pin marks after pinning, you may either use the Clover Wonder Clips or pin at seam allowance.
Note: The material I used is thin, if you would to sew it with heavier fabric, old T0shirt for example, please increase the strawberry size otherwise it grocery bag cannot fit into it.

Download the pdf pattern and print it out if you wish.
{If you can’t download the pdf pattern, probably you don’t have acrobat reader,
download the latest version for free here.}
Draw the pattern on the drafting paper.

Transfer the pattern to the fabrics, draw and cut them out.

Double fold the side seam allowance of the hull and sew.
Fold back and sew a horizontal line to create a pocket for drawstring
(sewing line does not shown here but you can refer to the next photo).

Place hull on top of red polka-dot triangle fabric (strawberry) with right side facing up.
Align raw edges together with hull at the center of the strawberry.
Sew with 3/8″ seam allowance.
Repeat the same to make another strawberry piece.

Place the strawberry piece to the bottom corner of the grocery bag,
baste it in place at seam allowance. Fold the ribbon into halve and baste it near to the hull (side seam).

Repeat the placement to the other corner but without the ribbon tag.

Fold the grocery bag with right facing each other, align the side seam and bottom seams.
Make sure the strawberry pieces align perfectly. Pin or clip.
Sew side and bottom seam with 3/8″ seam allowance.

Sew handles together, left and right, for both front and back piece of the grocery bag.
Double fold the seam allowances so that raw edges are inside, top stitch.

Bind the raw edges with bias tape. This is the side and bottom.

Then bind the raw edges around the handles.

1. Wrap the cord end with adhesive tape and make it pointy.
2. Insert the cord into the drawstring pocket (the one nearest to the strawberry).
Go around and insert the pocket at the back too.
3. Put in the end beads at both ends and tie a knot.
4. Burn lightly with lighter to stop the raveling.

The grocery bag with strawberry drawstring bag is done!

To store the grocery bag into the strawberry drawstring bag, all you need to do is to squeeze it in,
pull the drawstring to form a strawberry.
Keep it in your handbag or hang it as a charm, handy when you need to do
some urgent grocery shopping. It is small and light, it won’t take up too much space and load 
~~ HAPPY SEWING!!~~


